Tuesday, December 13, 2016

Holiday Neckerchief Slide


For our holiday pack night we made holiday themed neckerchief slides.


I've been asking friends and parents to save their tape cores since last year with this project in mind.  Unfortunately we didn't have enough so I go a piece of 1" schedule 80 conduit from the local electrical supply house and cut it into slices that same size and diameter as the tape cores.


I had already stumbled upon the perfect paracord on Amazon.


We wrapped the paracord around the tape core (pipe slice) in neat tight rows and then tied the two ends together with a square knot on the inside.  This part was a bit challenging.  We then clipped off the excess and fused the ends together.  These contrasted well with the gold wolf neckerchiefs the next week when Santa came to our pack night and handed out pinewood derby car kits to all the boys.


Tuesday, February 23, 2016

Games Tigers Play


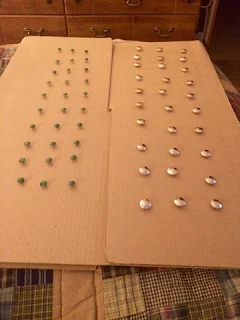
We are now working on our "Games Tigers Play" adventure, so this week's project will be to make a game. We are going to take our inspiration from a project my father used to build for us when I was a Cub Scout. He used hardwoods he had lying around his shop, ours won't be quite so fancy. We are going to make a wooden tic-tac-toe board that uses golf tees.


I waited until the last minute again, so in order to get Blue and Orange golf tees I had to make a trip to Golfsmith and deal with the length that they stock colors in, they're a little longer than I would have liked, and we'll get back to this later.


For the wood I was able to find a 5/4 in. x 4 in. x 8 ft. Select Pine Board at Home Depot, I then cut it into squares.  It was a true 5/4" thick, but only 3 1/2" wide, so the squares were 3 1/2" x 3 1/2".


Next I set up the table saw to score the grid for the tic-tac-toe.  I believe I had the fence at either 1 1/8" or 1 1/4" in order to end up with perfect squares once the edges were routed, we'll get to that next.


Once I had scored all the blocks I was ready to route the tops, and then round over the bottoms.  If I were going to do this again I would reverse these steps.  I ended up getting some tear out while routing because of all of the corners I now had after scoring them.  If I had routed them first and then scored them this shouldn't be an issue.


Once routed and scored you end up with 9 nice squares.  You can see the chipped corner in the picture below, hopefully reversing the routing and scoring steps will eliminate that.


Once they were all routed it was time to start drilling holes.


I made a template and marked each one, then drilled them on the drill press.  Honestly once I was doing it I think that centering the hole on each square by eye would have yielded as good if not better results that marking it with the template.  If I were going to do more of these, especially a large batch, I think I would make a jig for the drill press to line up the block for each hole.  I sized the hole to fit the golf tee snug enough so they wouldn't fall out, this posed a problem I'll discuss later.


I drilled them all the way through, because I wanted the boys to have to do something other than just sand them at the meeting, plus I had to buy longer golf tees than I wanted so the extra depth wasn't an issue.  I ripped down another piece of wood to 1/4" thick and cut 3" x 3" squares.  I then drilled 4 small diameter holes to make it easier for the boys to nail them on.


Adding the 3x3 squares to the bottom with the edges rounded over creates a similar profile to the top.


The finished product with the TIger Cub colors.


All of the materials and supplies packed up and ready to head to the meeting.


So here are some things that we realized once we went to assemble them at the meeting. Not all golf tees are identical.  While all of the orange ones seemed to be pretty uniform, some of the blue ones fit the holes and a lot of them didn't.  I had sized the holes using an orange golf tee, it never occurred to me that golf tees might not all be a uniform diameter shaft, especially two bags of the same size from the same brand.

While we're on the topic of the golf tees, these were 2 3/4" long tees, that's all I could get in the colors locally.  They are too long, they break fairly easily, especially when they get stuck and you're trying to pull them out.  After comparing them, I determined that my father used to make his with 2 1/4" long tees, but they do make even shorter ones, they also make plastic ones, which I think would probably be more uniform in diameter.

In the hours of golf tee research I did following this project I actually found tees that I want to try for a future project.  They're called step down tees and look like push pins, I think they'd work great for these projects.  They seem to make them in plastic as well, but the color choices seem more limited.

1 1/4'' Step Down Tees

1 1/2" Plastic Step Down Tees (Blue)


Tuesday, February 9, 2016

Valentine's Day Picture Frame

For this week we thought we'd work with the holiday and have the boys make their mothers a Valentine's Day gift. A picture frame with a photo of them in their uniform.

We started with simple wood frames that you can get for $1 each at Walmart. If you order them online you can get other sizes for $1.50-$2 each from Amazon or Home Depot.


I also got some heart themed stickers to decorate them.


The boys are always asking to paint, so this was a good project to let them do so.


I regularly take photos of everyone in our den so I cropped some down and had Costco print a bunch, after letting the parents chose which they liked best I trimmed them to fit the frame as the boys painted and decorated.

While they had their snack and let the paint dry we inserted the photos into the frames and the boys had a finished project to bring home at the end of the meeting.


Tuesday, February 2, 2016

Pinewood Derby Neckerchief Slide Project

So we just had our Pinewood Derby this past weekend, it was postponed a week due to 22" of snow that came down on the original date. Our Blue and Gold Banquet is coming up this coming weekend and we just wrapped up our most recent tiger adventure as a den, so we need something to do this week, we can start a new adventure the following week.

I've had it in my mind for a few weeks now that I wanted to make up custom neckerchief slides as a project, so Saturday night after the Pinewood Derby I was checking out Google Images and stumbled upon a few variations of pinewood derby car neckerchief slides. The ideas was good, however I had a few improvements I wanted to make on the actual execution. The basics for most of the designs I liked were that you find a piece of molding that has a similar profile to a car and cut it into little pieces that you then paint up and decorate, often using black thumb tacks as the wheels, and then attach a piece of pipe to the back of it to make it into a slide.

The molding wasn't hard to find, I actually found something with an egg and dart detail that when I cut it it the right spots gave a neat profile for the vehicle. I went to Home Depot but you should be able to find something similar other places. (Pictured is one of the slices of molding.)

A slice of the molding next to a quarter for size comparison.


Black thumb tacks however turned out to be very difficult to find. As one post had suggested, I wanted two different sizes, it looks more like a race car with a larger wheel in the rear. I was able to get regular size thumbtacks all over, but not in black. After going to four different stores trying to locate large ones I finally went online and found that Joann Fabric and Craft Stores has them, but they are called quilting tacks, and are with quilting supplies. I'd assume that other stores I had been in might have actually had them as well if I was looking with the quilting supplies.  These were actually even bigger than I was looking for, but they will work out well. I then painted them all black so they will look like wheels.  Unless you order stuff in advance this is probably easier than trying to find ones that come in black.a


Tacks before paint.
Tacks before paint.
Tacks after black paint.

The biggest hurdle has been coming up with a way to attach a ring to make it into a neckerchief. The other posts all seemed to use a piece of PVC pipe hot glued to the car in a vertical configuration. I would prefer to leave the car in a horizontal configuration. I also would rather not use hot glue and pipe, I'm concerned it won't hold up to repeated usage. I decided to try using a key ring as the loop. Attaching the key ring to the car though proved to be challenging. I wanted to cut a slot to glue a quarter of the key ring into so I tried using an oscillating saw and a Dremel tool did not have much luck. I picked up a slot cutting router bit that I will attempt to use in the morning and see if that works better.

As it stands now I have one coat of paint on the cars, the second coat will go on after the rings have been glued in.

The cars cut out and an initial coat of spray paint applied.


If all goes well tomorrow morning, then tomorrow night the boys will be attaching the thumbtacks and decorating their cars so they have their new neckerchief slides to wear to the blue and gold this weekend.

So I got that slot cutting bit at Harbor Freight last night and tried it out this morning, there might be a better solution out there, but this will certainly achieve what I was looking to do.


A 1/4" trim router with the slot cutter installed.

I cut a slot into all of them and then inserted the rings.  I cut the slot tight, in this case 3/32" so that the keyring was snug even without the glue.  My hope is that the glue will prevent them from being able to pull out, and the snug fit will prevent them from developing a wobble over time.

The car with the slot cut, ring inserted, and wood glue applied.


The cars with 2 more coats of paint.


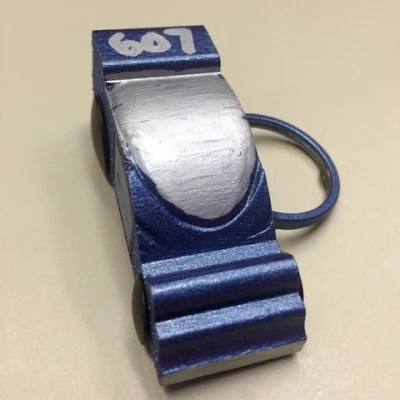
Once the glue had dried I sprayed the cars with 2 more coats of paint.  I then used an awl to make indents for the location of the thumb tack wheels.  I made up a demonstration one by inserting the tacks and using a silver Sharpie to add some detail.  The boys will work with their Tiger Adult Partners tonight to put in the tacks on theirs and then decorate them with  paint pens and puff paint.  The prep for this project is time consuming but the materials are cost effective.  I was only doing a dozen this time, but if I were going to do it again it would be more efficient to prep enough for all of the dens and then some, the additional cost in materials wouldn't be significant and I could probably do 4 times as many in only twice the amount of time.


With awl marks for the tack tires.

A decorated example.

A decorated example.

Testing the ring.
Testing the ring.


Tuesday, October 6, 2015

Uniform Display Rack

For this meeting we made a uniform display rack. This project had already been prepared for us by the pack's resident crafter.

She obtained a bunch of wooden plaques, sprayed them blue, supplied us with eye hooks for the top and cup hooks to hang the uniform.


She also made up and laminated Cub Scout logos which she pre-applied double sided tape to the back of for a finishing touch.