We first saw this idea at Cub Scout Shooting Sports Day last year.
They had this neat Angry Birds themed launcher at the Slingshot station to occupy half of the group while the other half were using slingshots, complete with the plush pigs as targets.


So of course I wanted to build one, I went online and found that other people had built some pretty neat ones. I started to concoct ideas for my own variation.


The first step was to find the angry birds, the pigs, and all of the hardware and supplies needed.
Right off the bat I knew I didn't want to use dimensional lumber, I wanted something more authentic, an actual piece of a tree. I reached out to a tree guy who has done me a few favors for me in the past, explained what I was doing, and what I needed. A few days later he dropped off a few pieces from an oak tree he had just taken down.
Right off the bat I knew I didn't want to use dimensional lumber, I wanted something more authentic, an actual piece of a tree. I reached out to a tree guy who has done me a few favors for me in the past, explained what I was doing, and what I needed. A few days later he dropped off a few pieces from an oak tree he had just taken down.

I went with the one on the left, at least for the first one I built. (I do plan to build a smaller more portable tabletop version out of one of the others if I can get my hands on the small birds and pigs one day.) I searched ebay for a few weeks until I found a good deal on a bunch of the plush ammo and targets. The seller was awesome and even discounted the price after I explained what they were for.

I found a perfectly sized water balloon launcher on amazon and ordered that too.
The pieces were all starting to come together, now I just needed some time to work on this project.
The pieces were all starting to come together, now I just needed some time to work on this project.

The first step was going to be removing the bark, for that I used a draw knife and a small hatchet.

After some rough sanding the next step was some wood filler to smooth things out and then another sanding before applying some danish oil to seal the wood.

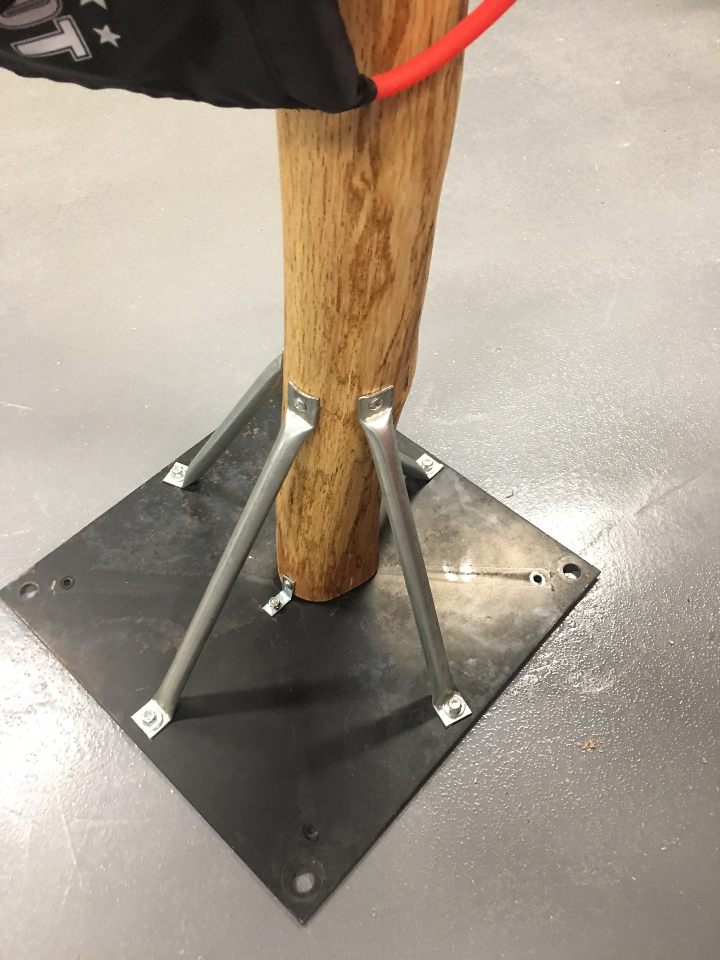
Now it was time to move on to making up the base. I wanted it to mount to a platform but I also wanted to be able to transport it which meant it need to either fold up or separate into two pieces. I contemplated a few designs utilizing a large hinge so it could fold flat but I eventually settled on a metal bracket that would be able to detach from the base.

This was a good start, I made the braces out of pieces of 1/2" conduit with the ends flattened and bent to the right angle in a vise. I secured them to the wood with screws and to the base with bolts to line everything up. I wanted to make sure that nothing could shift or come loose if the adults wanted to try it out too, so I replaced the screws in the wood with 1/4" bolts and welded the other ends of the brackets to the plate to lock it all in place. The base was then primed and painted before everything was assembled.
Building the platform was pretty straight forward, a frame of pressure treated 2x4 where it would touch the ground when it's outside, and then some scrap 2x3 as cross bracing. I used the 2x3's so that on uneven ground only the outer frame would touch the ground to prevent rocking. That was topped with a piece of 3/4" plywood, holes were drilled to line up with the bolt holes in the base and tee nuts were inserted and secured.
To finish off the platform is was wrapped in outdoor grass carpeting.
Now it was time to focus on targets. I wanted to make up crates that could be stacked up to put the pigs into. I also wanted them to nest inside each other for ease of storage and transport. To keep things light and keep the cost down I got a bundle of wood lath and used scraps for the end panels and made up a bunch of crates.
With everything built and assembled it was time to test it out. The only thing still to be done is fine tuning how long the launch mechanism should be and properly securing it. I'm still torn between lashing it to the posts with paracord or drilling holes and passing the tubing through.


