Monday, June 25, 2018

Angry Birds Launcher


We first saw this idea at Cub Scout Shooting Sports Day last year.
They had this neat Angry Birds themed launcher at the Slingshot station to occupy half of the group while the other half were using slingshots, complete with the plush pigs as targets.


So of course I wanted to build one, I went online and found that other people had built some pretty neat ones.  I started to concoct ideas for my own variation.


The first step was to find the angry birds, the pigs, and all of the hardware and supplies needed.
Right off the bat I knew I didn't want to use dimensional lumber, I wanted something more authentic, an actual piece of a tree.  I reached out to a tree guy who has done me a few favors for me in the past, explained what I was doing, and what I needed.  A few days later he dropped off a few pieces from an oak tree he had just taken down.


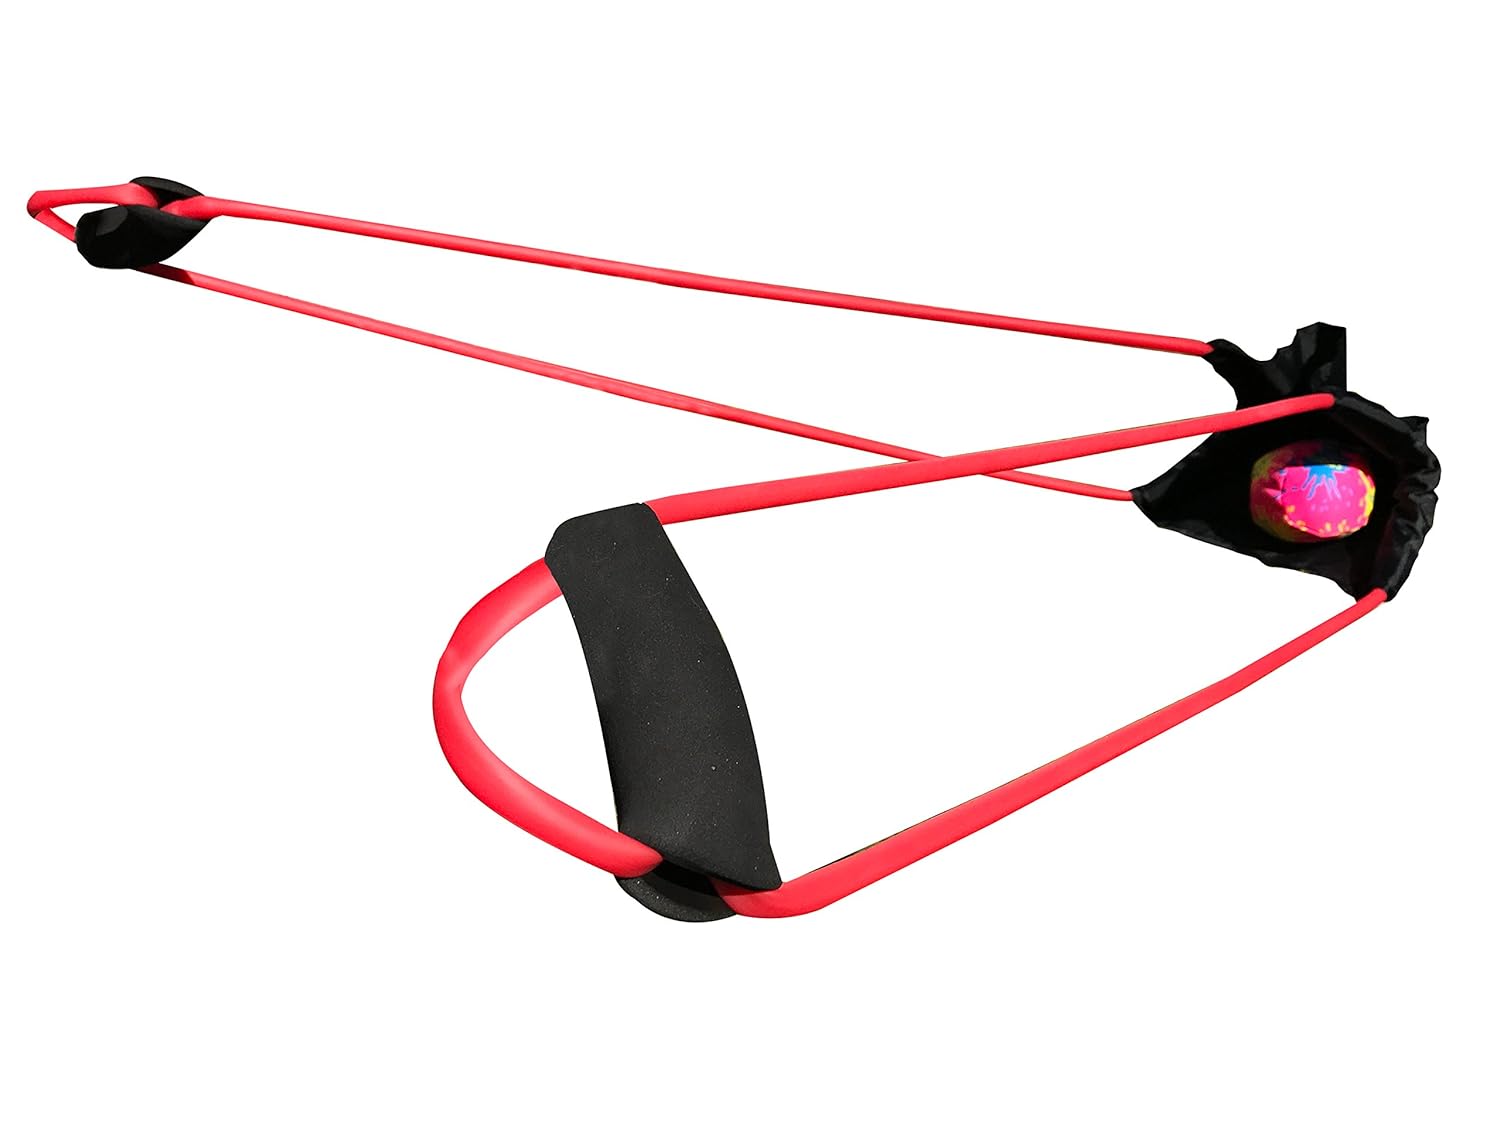
I went with the one on the left, at least for the first one I built. (I do plan to build a smaller more portable tabletop version out of one of the others if I can get my hands on the small birds and pigs one day.)  I searched ebay for a few weeks until I found a good deal on a bunch of the plush ammo and targets. The seller was awesome and even discounted the price after I explained what they were for.


I found a perfectly sized water balloon launcher on amazon and ordered that too.
The pieces were all starting to come together, now I just needed some time to work on this project.


The first step was going to be removing the bark, for that I used a draw knife and a small hatchet.


After some rough sanding the next step was some wood filler to smooth things out and then another sanding before applying some danish oil to seal the wood.


Now it was time to move on to making up the base.  I wanted it to mount to a platform but I also wanted to be able to transport it which meant it need to either fold up or separate into two pieces.  I contemplated a few designs utilizing a large hinge so it could fold flat but I eventually settled on a metal bracket that would be able to detach from the base.


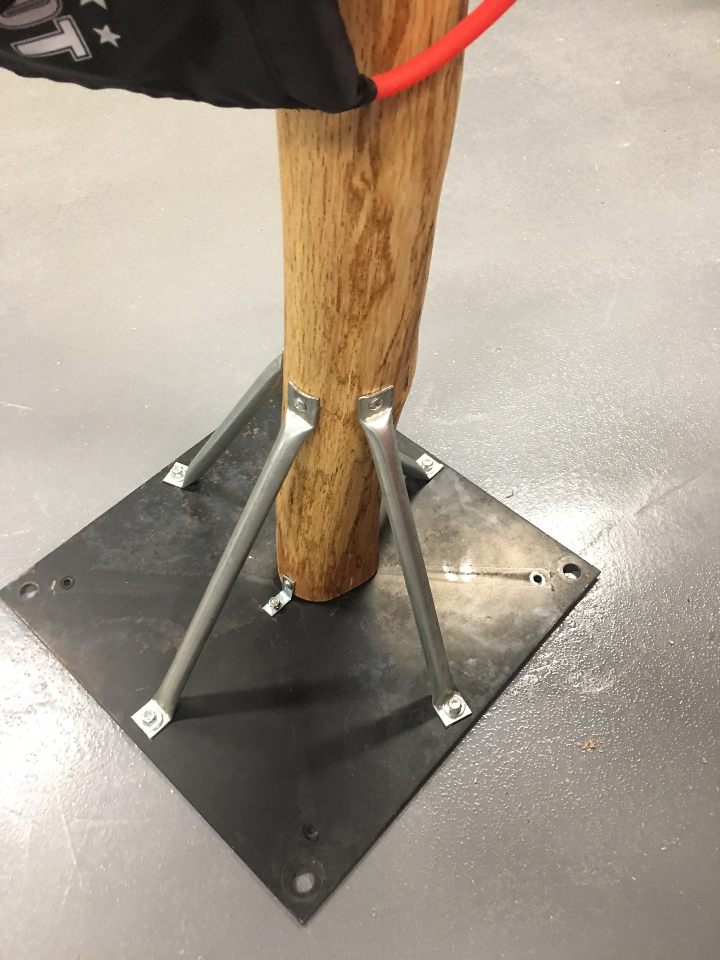
This was a good start, I made the braces out of pieces of 1/2" conduit with the ends flattened and bent to the right angle in a vise.  I secured them to the wood with screws and to the base with bolts to line everything up.  I wanted to make sure that nothing could shift or come loose if the adults wanted to try it out too, so I replaced the screws in the wood with 1/4" bolts and welded the other ends of the brackets to the plate to lock it all in place.  The base was then primed and painted before everything was assembled.


Building the platform was pretty straight forward, a frame of pressure treated 2x4 where it would touch the ground when it's outside, and then some scrap 2x3 as cross bracing.  I used the 2x3's so that on uneven ground only the outer frame would touch the ground to prevent rocking.  That was topped with a piece of 3/4" plywood, holes were drilled to line up with the bolt holes in the base and tee nuts were inserted and secured.


To finish off the platform is was wrapped in outdoor grass carpeting.


Now it was time to focus on targets.  I wanted to make up crates that could be stacked up to put the pigs into.  I also wanted them to nest inside each other for ease of storage and transport.  To keep things light and keep the cost down I got a bundle of wood lath and used scraps for the end panels and made up a bunch of crates.


With everything built and assembled it was time to test it out.  The only thing still to be done is fine tuning how long the launch mechanism should be and properly securing it.  I'm still torn between lashing it to the posts with paracord or drilling holes and passing the tubing through.


We took it out to the campground and set it up and it seems to work pretty well.

Monday, March 26, 2018

Toolbox Project

For our "Baloo the Builder" required adventure we started off with a discussion and demonstration about tools and safety.  After completing a worksheet the boys identified, or tried to identify different tools as I pulled them out of a bag.  Once we had completed that and gone over some safety rules each boy got the opportunity to mark a line on a piece of wood using a pencil and a square, then after placing it in the vice they got to cut off the piece that they had marked with a hand saw.

For the second meeting we identified what an object was by looking at a set of plans.  We then worked together to come up with a material list to build this object.  The item was a toolbox, and will be the useful project that we will build at the next meeting.

That weekend our den gathered at Home Depot for the Valentine's Day craft.  All of the boys who came built a bean bag toss as the fun project for this adventure.  They painted them as well.

Finally the day has arrived to build the toolboxes, and each one has a special surprise that the boys didn't know about.  Their name had been routed into their kit.  With a little help from their parents to hold everything in place, they used glue, a brush, a hammer, some nails, and a square to assemble all of the pieces.  They'll be bringing them back next week to apply a finish to the project.

The last step in this adventure was to apply a finish to one of the projects, so the boys chose between natural or medium walnut Danish Oil and applied it with a rag to their entire project.  Aside from a little mess they all came out great, and luckily we had covered the tables and their hands with a drop cloth and nitrile gloves.

Pictures, plans, and step by step instructions coming soon.

Monday, January 30, 2017

Pinewood Derby Car Stand


So a few months back I was toying with the idea of building a Pinewood Derby Display Shelf.  My thinking was that it should hold a car for each year of the Cub Scout Experience.  I looked all over online and finally found something that I really liked, the problem was the cost, at $30 each it just wasn't a feasible den project, plus they seemed to no longer be available.


One of the dens in our pack builds an individual stand each year for that year's car, and that's great, but who has space for 5 stands, I wanted something that could hold all 5 cars either sitting on a dresser or hanging on the wall.  I also wanted a project that they'd do as Tigers or Wolves so they'd have empty shelves they were eager to fill, a project that can double as a retention tool seemed like a good idea.  As a child lays in bed contemplating if they want to continue on in scouting I want those empty shelves to remind them they still have more cars to build.


Below is the prototype I made up with some scraps I had lying around my makeshift shop.  It was only 3 cars high but it allowed me to come up with some general dimensions to create my design.


So I figured out my ideal dimensions, and then spent a few hours on-line and in-store at the local home centers deciding on what materials would work best at the lowest cost and developing my materials list for screws, paint, etc.  I need materials for 9 finished projects.  The cost per project worked out to be just under $10.


What I ended up with were four 8' long kiln dried 2x4's and two 2'x4' sheets of 1/2" MDF.  If I were making any more than 10 it would pay to get a full 4'x8' sheet but that would have required using the truck and moving the saw outside to rip down, so I'm glad I only needed 9.


The MDF sheets were cut down to 9 1/2" wide by 24" high pieces as the back panel.


The 2x4's were cut to 7 1/2" long blocks.


I then cut 1/4" off the side of each block to square them up. The scrap makes for good fire starter.


I then cut a little more off the other side to make them 2 3/4" wide.
   

Once the sides were squared up it was time to cut them to height, I wanted them to be 1 1/4" high to account for the 1/2" notch and still have 3/4" of material to fasten to.  This whole thing could have been done using 3/4" pieces and fastening 1/2" thick strips to the top.  I'm not sure which method would have ended up being easier, one is more cutting, one is more assembly.


I ran each piece through the saw 4 times with the fence at 1/4" and the blade height at 1/4" to create a notch for the wheels.


Now that all 360 cuts had been made, I then sanded each side, especially the ends.


Now that I had all of the shelves cut I made up the template for the back panel.  There is a hole at the top to allow it to be mounted on the wall, there are 3 holes to attach each shelf, and the top corners were dog eared for aesthetics.  Once the template was made up I gang drilled the back panels on the drill press for the 144 holes.


I made up and positioned a makeshift fence for the drill press to drill pilot holes in each shelf.  This will aid in lining everything up when the boys assemble them.  The fence kept the holes centered top to bottom on each shelf.
  

Once these 135 holes were drilled the parts were ready for hand sanding and painting.


The back panels were painted first.


Then the bottom shelf (Tiger).


The next shelf (Wolf).
  

The middle shelf (Bear).


The WEBLOS shelf, I did it as the pants of the uniform, or if you do one shelf red it could be the green in the Weblos Colors.


I did the AOL shelf in Khaki like the uniform shirt but you could make this the red shelf of you wanted to do the Weblos Colors.


Everything painted and curing before assembly of the example.


There are the screws we'll be using, they're long enough to grab but not so long that it takes the boys forever to install them.  They're a T-20 drive so I had to gather up all my universal screwdrivers and torx bits, but they'll be a lot less slippage than trying to use philips head screws, they also have a type 17 point so they'll go in easy, especially with the pilot holes I drilled already.


This is the back of the assembled unit with the screws installed, they recess into the MDF easily enough for a nice smooth back when it's done.


Here are some shots of it assembled with some of the cars that I've made on it.  The sticker of the pack crest I had printed by Sticker Mule in anticipation of doing this project.  The top point covers the hole I drilled for hanging it on the wall, but you can easily poke a screw through the sticker if you want to mount it.


Tuesday, January 24, 2017

Balance Beam

So we needed to do the balance activities to finish the Running With The Pack adventure for Wolf, and while we could have just dropped a piece of wood on the floor I took the opportunity to make the balance beam that my kids have been asking for.


I took a 2x4 and cut it to 6' long, then cut three 1' sections for support and 2 lengths of 2x3 for additional support.  Glued and screwed everything together so that it would be nice and strong for a bunch of kids jumping around on it.


Painted the bottom blue to seal it.


Painted the top yellow.
  

Then masked off the yellow in the center and painted it blue to get a blue and gold striped effect.

Saturday, January 21, 2017

Stanchions and Plastic Chain

So last year at our Pinewood Derby, and then at our Blue and Gold, and then at the Mall Show, I kept wanting to come up with some better means of crowd control than cones and rope because while they did work to an extent, they were very easy to knock over or push out of the way.  Plus they weren't Cub Scout themed.  This is what I came up with, and will be building more of.

The finished product.


 I had decided on 6mm yellow plastic chain, as it's highly visible and relatively light. The next step was to design the stanchions.  Originally I wanted to utilize PVC pipe with a threaded flange so that they could be broken down for storage but that was going to get expensive.  We could have bought the ready made plastic stanchions for the same price it would cost to construct them.


Then I stumbled upon these 2x3 balusters at Home Depot and they were just the right size.  I still wanted them to be able to be broken down and considered utilizing hanger bolts and wing nuts to attach them to the MDF bases I had made, however I was running out of time and using what I had on hand won out over tracking down the right hardware.  I ended up using 5/16" x 4" lag bolts.


The edges of the MDF bases were rounded over with a router, as was the top of the baluster.  Once everything was assembled it was all sprayed blue.  The last step was to attach the chain to the stanchions and for that I ended up going with 1 1/4" white safety cup hooks.  These are the perfect size to hold the chain and offer a certain amount of deterrent from just unhooking it to walk through.